Making a Parasol Bag
I use this mid-Victorian folding parasol often.

It came to me with one horizontal slit in the exterior silk. The lining was in perfect, but fragile, condition.

I know I'm "supposed" to use a rubber band to hold it open, rather than stressing the silk by opening it fully. But I don't. For one thing, I don't like the idea of a utilitarian, icky rubber band sullying its Victorian perfection. And I like to feel the catch snap into place. Of course it now has several more splits to show for it.
 photo: Khang Mai
But it's so vulnerable. If I lay it down on any surface, I fear loss, theft, or irreparable damage. Even tucked beneath my arm (not the most comfortable way to travel), it's prone to damage from rubbing against my dress and its folded self. Then there's the lace, which catches and tears easily. I repair sections of torn trim with ultra-fine, cotton quilting thread, which I bought specifically for that purpose, after nearly every use.
It was clear I needed a way to carry it safely and attractively when it wasn't open.
I've seen dresses with those incredibly appealing integral parasol pockets. But they seem to be an 1870s trend. Like the holsters you see on late-Victorian (and Steampunk) costumes, they're better suited to the bustle silhouette than the bell-shaped Civil War skirt.

I needed another solution. I'd seen a single example of a parasol bag, and that was for at-home storage. But that didn't mean a carried version never did or could exist. Surely some enterprising woman had whipped one up back when, right?
At the Nash Farm Reenactment, I bought half a yard of exquisite blue-gray silk from a sutler specializing in period-correct textiles. As you know, I'm no seamstress. But the bag didn't need to be tailored to fit anyone but the parasol, so how hard could it be?
The following techniques were pulled directly from my ear. My goal, although I can't say why, was to avoid raws seams (including pinked or overstitched) inside and out. It had nothing to do with period correctness. Chalk it up to OCD.
Here's a view of the fabric, cut to size for doubling to create a self lining. I've stitched all the raw edges, turned them under, then hemmed the entire thing. Again, not sure why. Neatness counts?

I'd be folding over the top for a decorative edge, and folding up the bottom to create a channel. But first I needed to attach the strap, which I'd made from a long strip of fabric folded bookwise. I ironed it closed with a strip of UV-stable MistyFuse down the interior length. This provided a bit of stability. Also, it was the only way I could figure out how to make the edges smooth. Again, not a seamstress.
I attached the strap to the now-doubled body of the bag, first finishing and then tucking under the edges of the strap:

Next, I made the channel at the bottom of the bag:

I then created a tube by butting the sides up against each other. With one edge of the handle flapping free on the exterior, I pinned it together, flipped it inside out, and hand-stitched the bag closed.
Turning it right side out, I hand-stitched down the flapping edge of the strap. If anyone knows of a way to machine sew the length of a tube, please tell me.
I then threaded a length of silk ribbon through the channel and cinched the bottom of the bag closed. The tip of the parasol slips through the opening, like this:

I trimmed the top edge and the edge of the channel with antique cotton lace. And I thought that was that.
Here, with the parasol in use, the finished bag sits on a bench at this year's Sunday in the Park festival:

Yep, it looked like a wine tote. A closure at top was needed -- more for aesthetics than security. It's deep enough that nothing will fall out.
Also, I wanted to add a pocket for my antique hand fan, which never seems to fit in my reticule, and can't stay on my wrist when we're performing. It needed a safe spot.
Back to work!
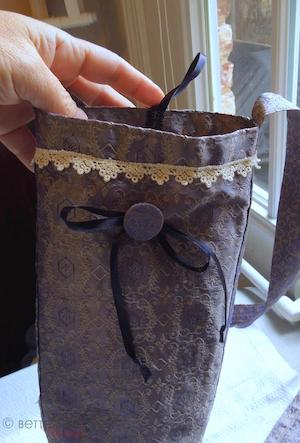
One side got a covered button, with additional silk ribbon for a decorative bow and a loop closure:

Next, I created a rectangular patch with a decorative top flap, again with the crazy no-seams rule. Here's the interior:

Finally, I hand-stitched the pocket to the back of the bag, and used the last piece of lace to trim the flap. My fan tried the new pocket on for size:

Et, voilà! The finished parasol bag:

