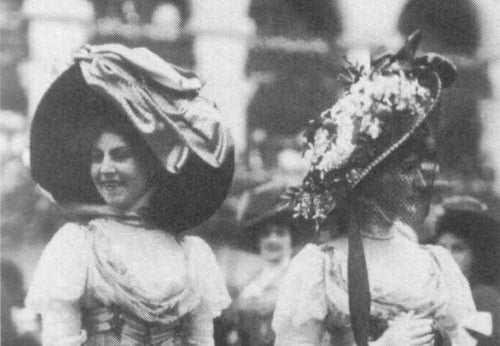
Recreating an Edwardian Hat
Here's how I went about "cobbling" a big, fancy, Edwardian hat to wear to tea with my dress-up group, The Atlanta Time Travelers.
Sure, you could buy an antique hat. But this was more fun. And if I don't count my time or blood loss in the equation, much less expensive! It's not difficult and requires no advanced sewing skills*. It only takes time, patience, and a few supplies, including, in my case, band-aids.
*You could do this entire project without sewing a stitch. All you'd need is a hot glue gun and maybe some fabric glue. If glue's fine by you, it's fine by me. I am not judgmental when it comes to costuming.
(I'm very judgmental when it comes to potentially endangering lives. For now, in the midst of a pandemic, consider ordering your supplies online.)
To start, you'll need a base hat. Yes, I had options. I used one of several very basic, natural-straw sun hats. It cost $3 at a thrift store:
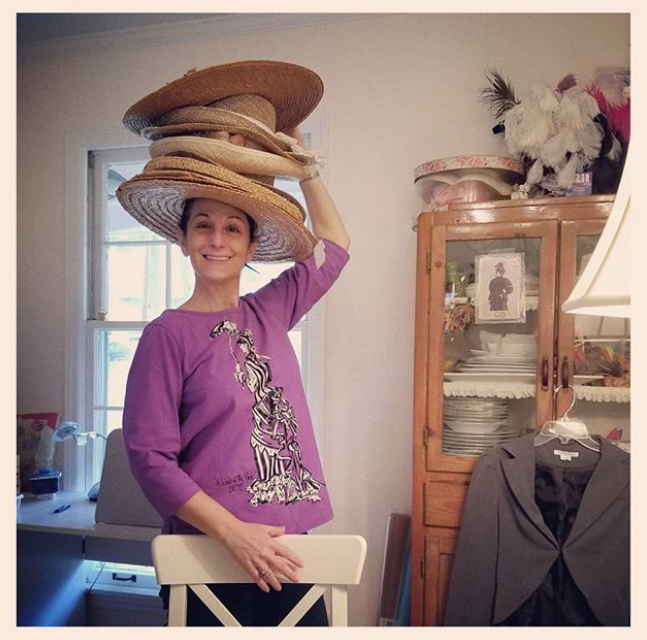 When you can't wear a bustle dress, wear an unflattering bustle-dress t-shirt!
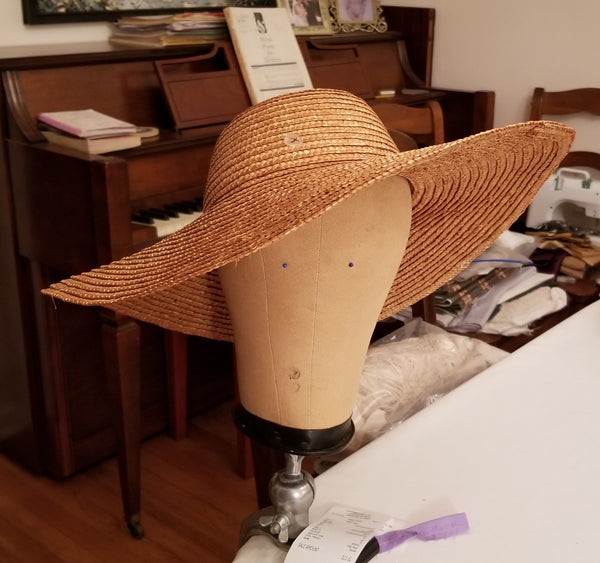
Step one is to whip your hat into shape. I used a mini hand-held steamer. You could hold your hat over a tea kettle or pot of boiling water. Anything that produces lots of steam will work.
Be forewarned, it takes a long time to see results. Be patient. Keep steaming, coaxing the hat to reshape, and holding the new shape in place until it's absolutely cool and dry. You can use clips and gadgets to help, but be careful not to create unwanted sharp crimps.
Here's my hat being reshaped. Its once completely flat brim is developing a permanent swoop. And my vintage hat form mannequin, Mabel, now has eyes.
Time to choose fabrics. I wanted my hat to coordinate with a particular dress while being neutral enough to work with other outfits. If you're going to do a lot of work, and have limited time and/or resources, it's best to make something versatile. And no, your hat doesn't have to match, merely complement.
Suitable fabrics I had on hand ranged from $2/yard poly lining fabrics to pure silk. I was more concerned with a pleasing color scheme than with using only superior materials.
 L: The dress I planned to wear. R: Potential fabrics.
Time to cover the hat.
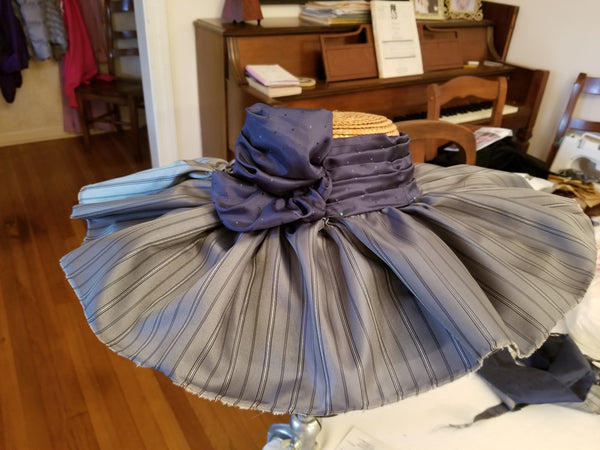
I was nervous, so I procrastinated and made a hat band.
Here's the in-progress hat band with a flower mock-up. It's all pinned in place to assess the overall look. Do you agree that it's pretty as is?
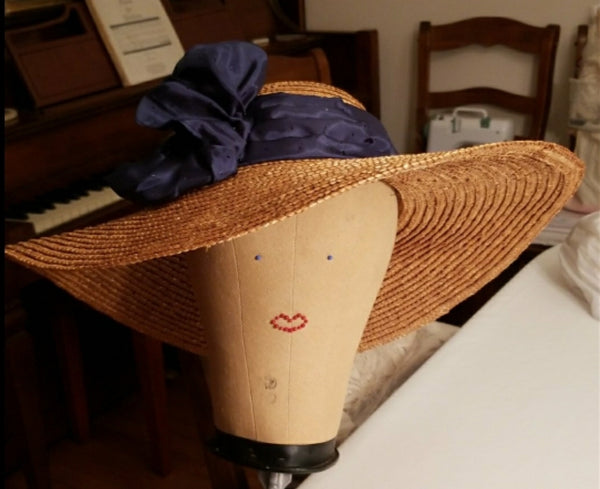
Mabel gets a mouth.
To make the hat band:
- Measure the circumference around and height of your hat's crown.
- Cut a rectangle of fabric a few inches longer and about twice as tall as the crown.
- Finish the edges (turn up and press, stitch if desired).
- Pleat as desired, press, stitch to keep the pleats in place (you're not making a face mask, it just feels like it for this step).
- Wrap around the crown. It's like a hat cummerbund.

The hat band is an oblong, turned under for tidiness at the edges, then pleated.
Time to get on with it and cover the exterior brim. And as it turns out, this was really no big deal. Then again, it's a hat, not neurosurgery. The risks are minimal. Forge ahead!
✂︎ HELPFUL TIP 1 ✂︎ It would've been easier and faster if I'd done the interior before the exterior, so remember for next time: interior brim comes first.
But I'm showing you what actually happened. Here's how I did it:
I cut a width of my chosen fabric several inches taller than the width of the brim. I basted and gathered one long side. Don't overthink or worry about this. Just gather up one long side of the fabric however you can.
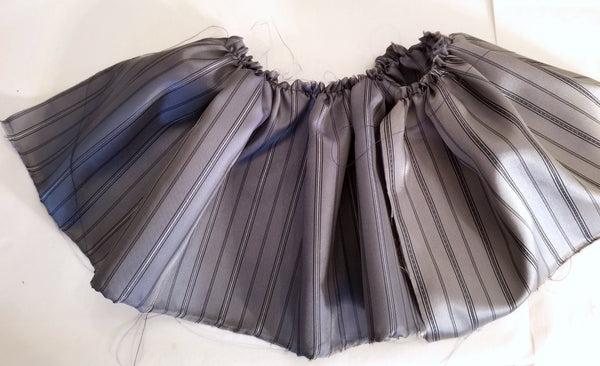
I tidied above the gathers, then pinned this piece onto the brim (actually, I attached it at the bottom edge of the crown, so the hat band would hide the gather line). I can't recall if I needed to add another section to make it all the way around the brim, but if so, no matter. Joins are easily concealed in the folds, and a few stitches will prevent gaping.
The photo below shows how the fabric extends a few inches past the brim, as planned. Nothing is stitched down yet, just pinned:
I preferred and used the less-shiny, bluer, darker "wrong" side of the fabric. But regardless, in order to have the stripes radiate out like spokes, I used the width of the fabric rather than the length. It worked fine.
With needle and thread, I stitched the fabric to the hat, all around the base of the crown. I was too busy preventing blood stains to take a photo, so please enjoy these images of a few of my hat-cobbling injuries, all minor.
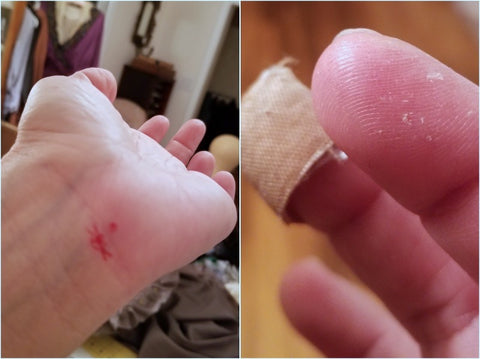 The roughness of my index finger is from poking myself repeatedly with various needles,
particularly the brutal-but-convenient self-threading sort.
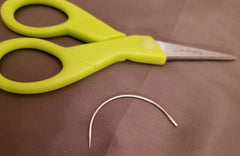
✂︎ HELPFUL TIP 2 ✂︎ You will lose your mind or die of blood loss hand-stitching through straw at an awkward angle with a regular (straight) needle. The solution is a curved needle (a.k.a. carpet, upholstery, quilting). They're easy to find, inexpensive, and work like a charm. Wish I'd discovered them sooner.
Next step: Sew the fabric to the hat at the edge of the brim.
I used a machine for this. Sewing through crunchy straw was strange, but my machine (a modest Singer Patchwork) had no problem with it and my goodness, that's speedy (and draws less blood).
Go slowly. Keep the fabric evenly taut. Avoid distorting your reshaped brim. Maintain reasonably even gathers. Don't run out of fabric before you've made it all the way around. Despite all these warnings, this step is not difficult and it's really gratifying. You'll like it.
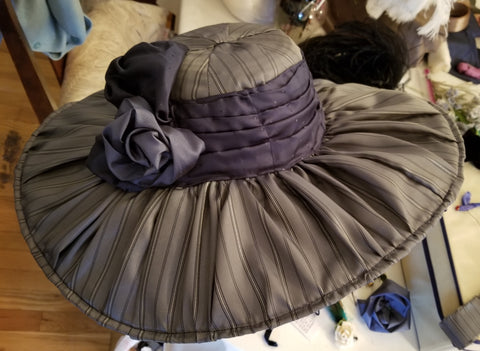
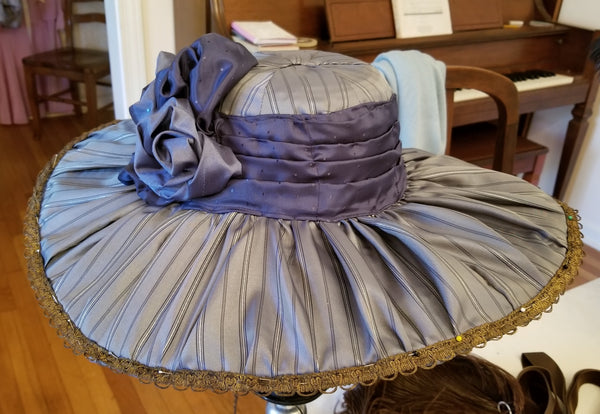
When you're finished, it looks like this. I find it extremely appealing, if imperfect (just like our favorite people, right?).

All this time, the naked crown was glaring at me. But if the brim cover seemed daunting, covering the crown seemed impossible. To avoid thinking about it, I half-heartedly experimented with embellishments, all of which looked ridiculous.
Just two examples:
 Dumb and dumber.
It's no fun knowing you're only doing something to avoid doing something else. I suggest you skip this time-wasting silliness and cover the crown straight away.
Here's how:
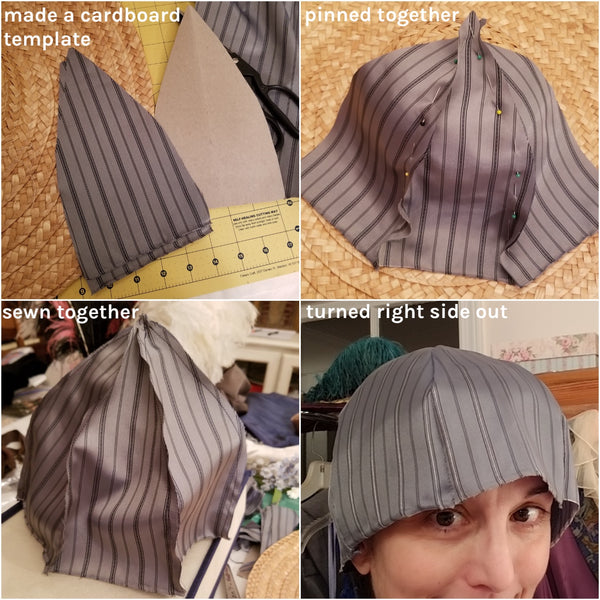
- Recall from 10th grade geometry, or a box of Laughing Cow cheese, that a circle is comprised of wedges.
- Create a triangular template and use it to cut fabric wedges.
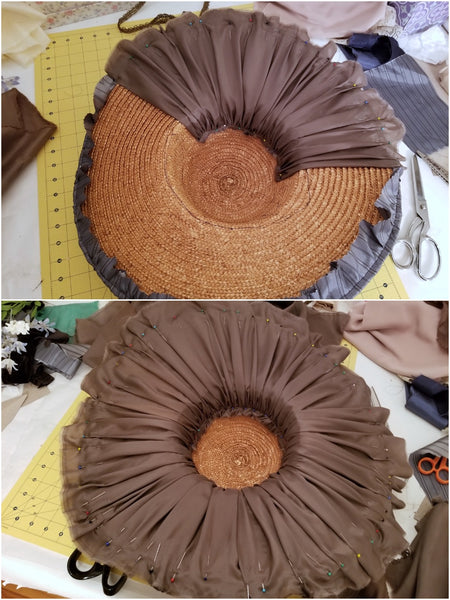
- Place these wedges face down on the crown and pin them together until the crown is completely covered.
- Sew this thing together by stitching up all the pinned seams. It looks scary but trust me, it just works.
- Flip it right side out, stick it on your head and exclaim, OMG, I can't believe I made this super cool tea cozy thingy! I wonder what else I can do?
 Yay, high-school math! Yay, cheese!
Next up, fabric flowers.
Here's how to make one. Start by creating a tube:
- Cut a rectangle of fabric about as long as your cat.
- Fold the rectangle, making it slimmer, not shorter, with right sides facing in.
- Stitch the long end and one short end shut.
- Flip/push it right side out (if needed, use a blunt tool to help).
- Sew shut the remaining open end.
- Don't press the tube. Leave it soft and uncreased.
Vary the tube length and height to make different size flowers. Experiment.
Roll up the tube in a haphazard fashion to resemble a rose. Pinch and stitch the bottom of the flower together (don't miss any layers or it will pop apart/unravel). Create a more natural look by using hidden stitches to pull the "petals" this way and that.
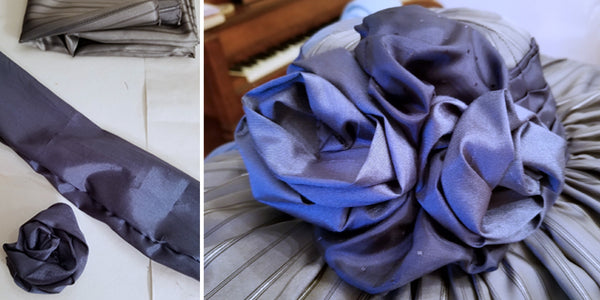 Four mediocre flowers in two fabrics.
Put it all together.
- Thread your curved needle or fire up the glue gun.
- Place the cover on the crown and tack it in place. Use several stitches below the line of the hat band, and maybe one through the center top for good measure.
- Pin and then stitch the hatband around the crown.
- Once the band is in place, add the flowers to conceal the join.
 Ready to be stitched with a curved needle (or glued) to the hat.
Here's the exterior fully covered, with the band and some of the flowers stitched in place.
 It's starting to look like something!
Time to work on the interior.
Begin as you did for the exterior. Gather a length of fabric that will overshoot the edge of the brim and pin it in place inside the crown, as well as along the outer edge of the brim.
✂︎ HELPFUL TIP 3 ✂︎ Here's where doing the interior first will really makes things quicker and easier. Much simpler to have the interior brim lined, then simply bring the extra exterior fabric over it, fold under, and stitch it in place in one step.
Here's my interior lining going in.
 Pinned far up inside the crown and also along the edge of the brim.
✂︎ HELPFUL TIP 4 ✂︎ For the interior lining, work down inside the crown, not up near the brim. More of the interior than you'd think will be visible during wear and you (or maybe just I) don't want those seams to show.
I used the curved needle to attach the lining, taking care not to go through the exterior fabric.
✂︎ HELPFUL TIP 5 ✂︎ In the top photo you can see a big mistake. I'd cut away too much of the exterior fabric leaving almost no overlap in some spots. Because of that boneheaded maneuver, it took much longer to create a neat inner edge. Don't do this.
But wait... it gets worse.
These fabrics were quite shreddy, so I used pinking shears, the most disaster-prone of sewing implements, to trim the excess. Here's what happens when you are not absolutely vigilant when using pinking shears.
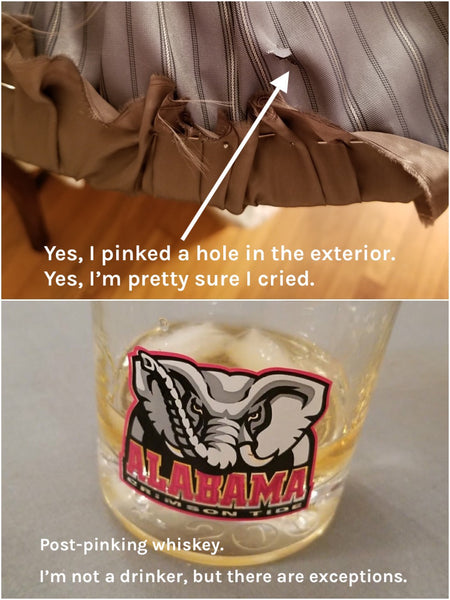 I concealed the hole with a tuck and a stitch. But my OCD self was gutted.
After a short break to drown my sorrow, I pressed on.
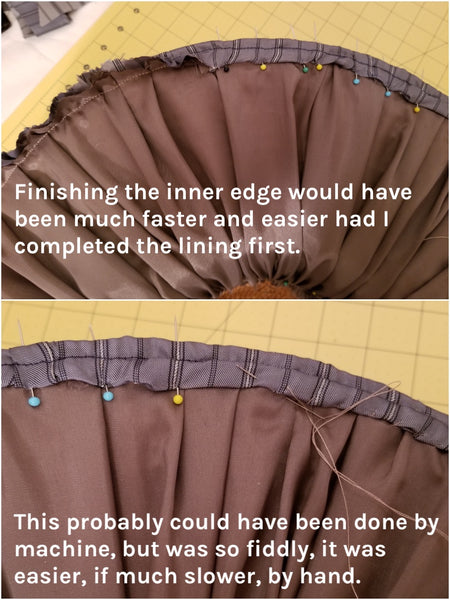
I realized I could save time and blood by machine stitching the inner edge and hiding the new stitching line on the exterior with decorative trim.
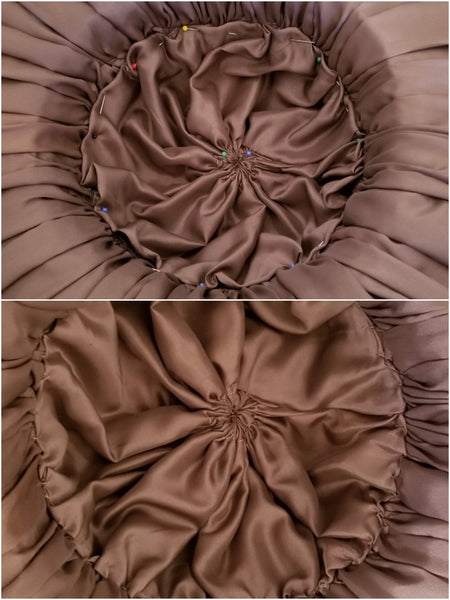
The top photo below shows the trimmed down and machine-stitched interior fabric, with the turned-under exterior fabric being pinned over it.
The bottom photo shows me using a regular needle to tack the exterior fabric to the interior fabric, as if I were putting up a hem. Very simple.
Had I lined the interior brim first, and not cut the upper fabric too short, this part would have been relatively quick and easy. No matter... I was pleased with the results.
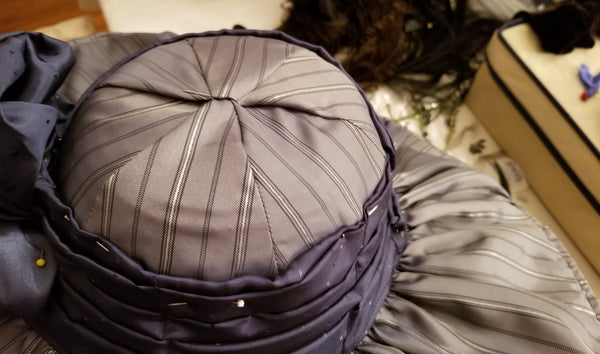
Here's how the interior looked at this point:
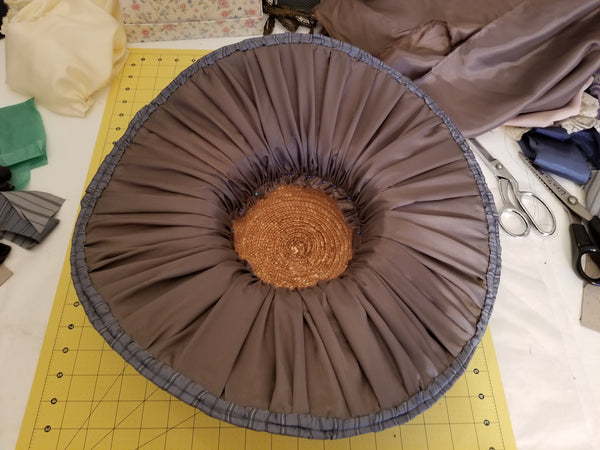 Looks good enough to eat, no? Like a giant mushroom.
That naked inner crown really bugged me. Even though I'm probably the only one who'll ever see it, and certainly the only one who'd care, I had to finish it.
Time to make another tea cozy. This one is similar to the poof at the back of my Regency bonnet.
Here's how to make an interior crown poof:
- Measure the approximate depth and inner circumference of the crown.
- Cut a rectangle of lining fabric several inches longer and taller than these dimensions.
- Hem one long edge.
- Fold over the other long edge about an inch and stitch to create a channel.
- Slip any slim ribbon, string, or length of yarn through the channel, leaving a longish tail dangling out on both sides.
- Fold the rectangle so the short edges meet, with right sides facing in.
- Sew the short edges together, leaving the channel open and ribbon ends free.
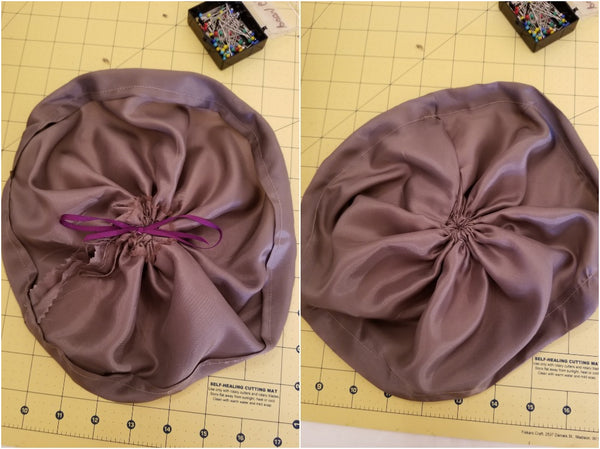
- Pull tight and knot the ribbon, trim off excess (photo below, left).
- Flip it right side out (photo below, right).
Smush your poof into the crown, pinning it so it hides the raw edge of the lining. Stitch it in place. You might want to tack the center to the straw to prevent shifting. The rest of it can be stitched only to the lining fabric.
✂︎ HELPFUL TIP 6 ✂︎ Edwardian hats tend to be huge and sit atop a gigantic hairdo. Smushing the poof down into the crown helps make the crown shallower. This means you can get away with less hair up top.
Here's the completed interior.
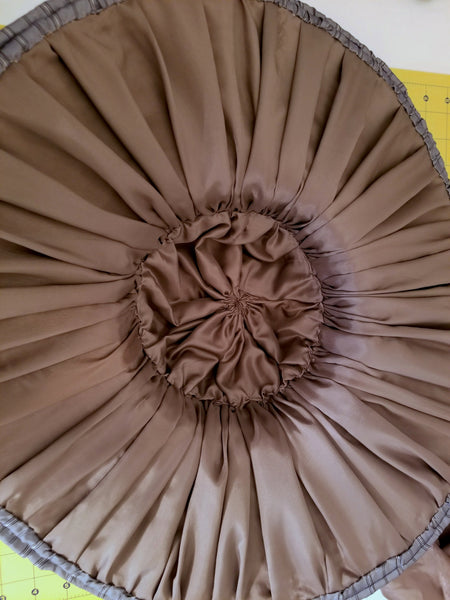
I thought it looked pretty good, and next time, doing the inside brim before the outside will save several steps and lots of time.
✂︎ HELPFUL TIP 7 ✂︎ If you're adding embellishments to the crown that need to be stitched all the way through to the interior (something heavy, for example), consider inserting your poof later so it will conceal those stitches.
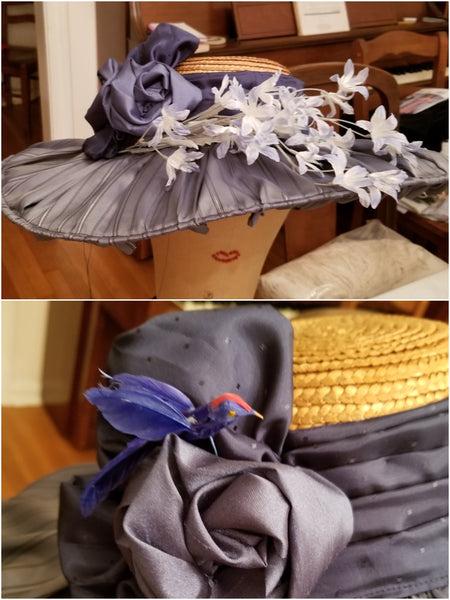
Next up, trimming the outer brim edge to hide the machine stitching lines. I thought this metallic passementerie added depth and polish. Here, it's pinned in place awaiting hand stitching.
Last up, the final trims. Potential candidates included these and other bits and bobs I had on hand.
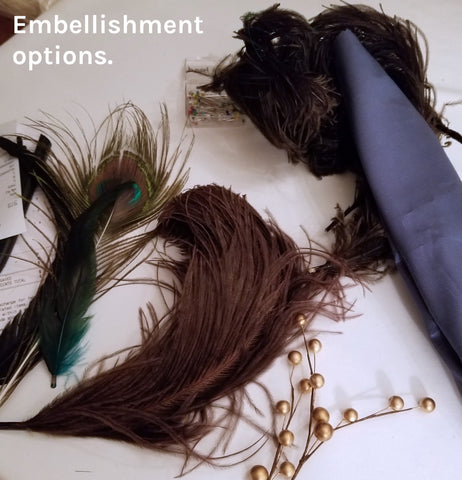
I arranged various feathers until I liked how it looked. Working with feathers can be a bit stressful. They never want to stay where and how I put them. I've found it helps to stitch right through the feather's central core, and to attach the feather to the hat at several points along the shaft, where feasible.
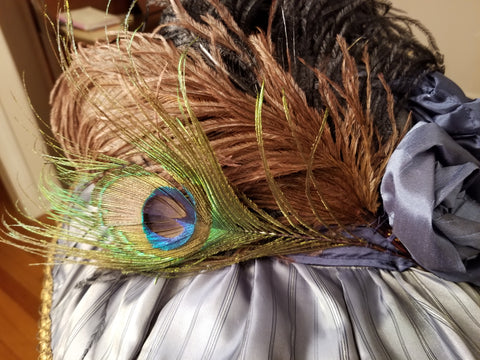
The feathers were slipped behind the flowers and stitched in place.
✂︎ HELPFUL TIP 8 ✂︎ A light, strategic hand with your tacking stitches early on allows you to more easily add embellishments such as feathers, later. It's better to do a bit of reinforcing once every element is placed exactly as you'd like, than to overdo, only to have to undo and redo.
And finally, the absolutely last bit!
For the finishing touch, I wanted something that would pull it all together, offer a little brightness without excessive contrast, and conceal the stitching holding the feathers.
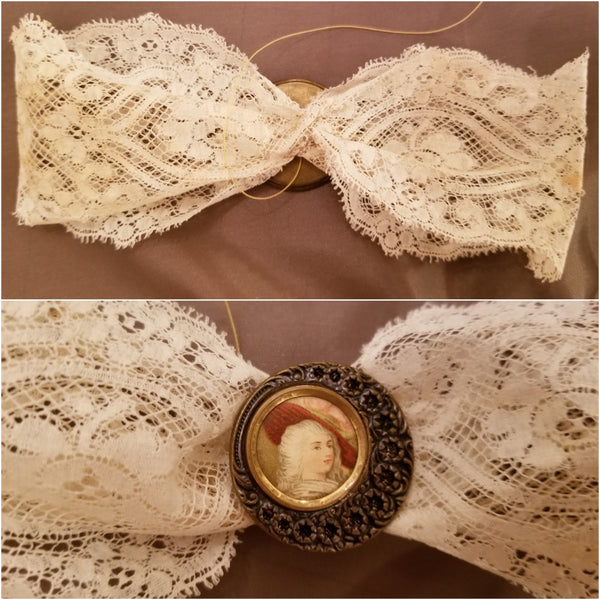
As I often do on my custom-cobbled shoes for The Splendid Slipper, I created a decorative bow. This one is made from a length of antique cotton lace, looped and nipped at the center. The beautiful old button was a gift from my friend Lizzie, purchased at an antiques shop on one of our many outings. I was so pleased to put it to good use.
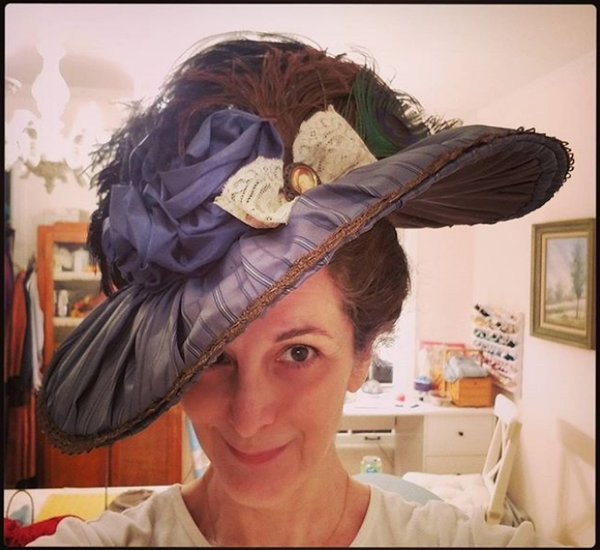
I attached the bow and popped the hat on my head. I'm tilting down a bit to show off the embellishments. The photo is mirrored, but flipping it made it look as if I were staring off the page.
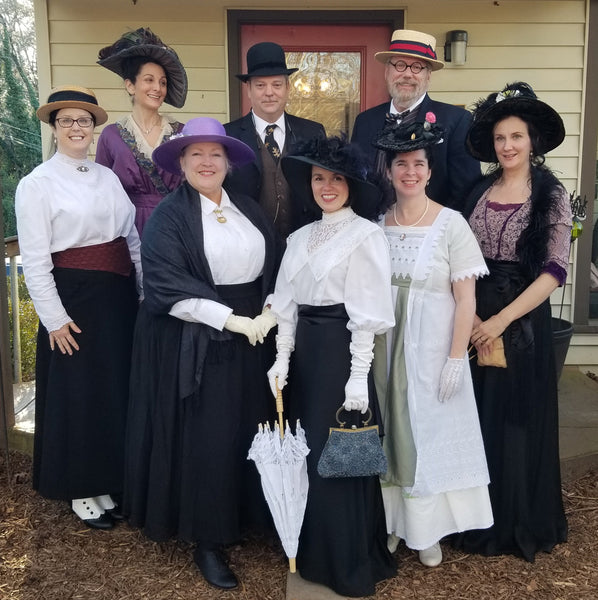
And here we are at the tea room. It was a lovely event. I miss my dress-up buddies and look forward to being with them again before too long.

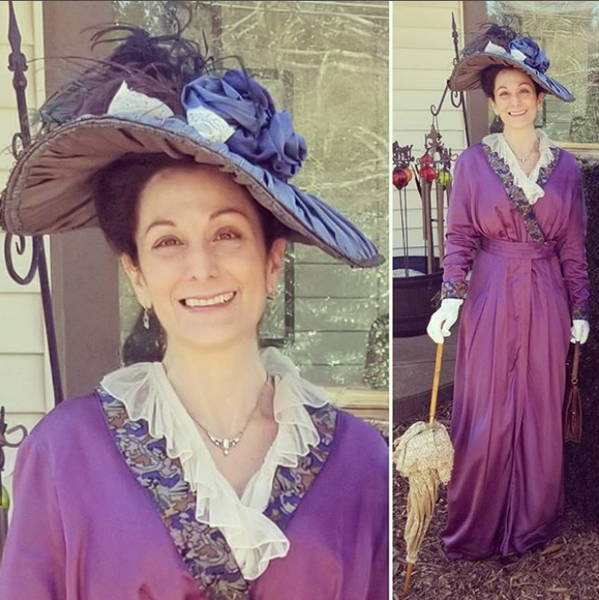
Here's a closer look at my outfit. My all-time favorite parasol (from lovely Erika at La Roux Vintage) and my silk dress are both antique.

Thanks for reading my post. I hope you find the instructions and advice helpful. If you attempt your own cobbled hat, please share your experience!
I welcome you to leave thoughts, suggestions, and questions in the comments.
Stay safe and stay well, everyone!
~ Liza

Comments
Wonderful to read and you gave some real time saving tips and want you to know that I have learned so much from my mistakes. Tha nk you again for sharing
Most enjoyable Pinterest post I have read! Your writing is adorable! Lovely hat…fun to be given a look at your ups and downs…and ups again!
Thanks very much, everyone! I appreciate your taking the time to read the post and comment. – Liza
I agree with what Mary said! I LOVED this article!!!
I so enjoyed this post and for sure will be bookmarking it. I too have cobbled some hats for various costumes and Iove every one of them. They were practically free to make and are all quite lovely. I particularily enjoyed your writing style. If you want pictures I would be happy to shoot you some.
I loved this tutorial. Your hat is beautiful. I am a member of the Red Hat Society and we love dressing up and wearing our hats. I also love to embellish my hats and enjoyed reading how to convert them.
I love reading about how you made your lovely hat! I hope to make a hat similar to yours to go with the Edwardian outfit I am sewing. Thank you for the great inspiration! I really appreciate your advice!
Chances are I will never make one, I sure enjoyed watching you make yours. It is very pretty. You looked as if you were back in the day.
BRAVA! What a lovely hat, and you put a great deal of effort into it. I particularly love the shirred facing, it really puts the cream on the top (or the bottom). You look beautiful in it.
Beautiful! I’ve always loved millinery and collect vintage clothes. Edwardian is my favorite era, and have numerous blank straw hats, but I just look at them and decide to go clean house Instead. I have bought grosgrain hat ribbon that stretches but I don’t even know if I should glue or sew it on! Would much rather sew, but all stitches would show! Any suggestions? You are a brave, brave soul. Your hat is spectacular and I envy your courage and perseverance. Pam
Pam, thank you! The answer to whether to sew or glue is, “whichever means you’ll get started and wind up with a hat!” With glue, I’d suggest doing a little test beforehand, using scrap materials, to make sure that whichever glue you choose doesn’t seep through or change the color of your ribbon (or other embellishment), or perhaps make the underlying fabric bleed or pucker.
If you sew, try using a curved needle. Sometimes it’s the best solution. The stitches won’t necessarily show, and those that do likely won’t detract from the overall effect. Just find a thread that matches the ribbon (go with darker rather than lighter, when in doubt) and keep the stitches tiny, spaced far apart, and on (or as close to) the ribbon as possible. You can also try using invisible (clear) thread, which solves the problem. I find it kind of difficult to work with. For one thing, it’s hard to see, lol. Good luck and keep us posted on your progress!
Lovely as a movie set!
What a lovely experience to read your tutorial! I used to collect hats of various types and vintages. I did sell a bunch of them, but still have quite a few. I would love to wear some of them, but where? I don’t have anyone to share this passion with, so I found your dress-up club fascinating! What a fun idea! I’ve got lots of fabric, feathers, ribbons, sew-on rhinestones and fake flowers, so I could try my hand at making a beautiful hat. For now, I’ve been trying out making doll hats, as I have collected dolls over the years, too. I may employ your tutorial to them, but I’d like to try a real hat, like yours, too. Thanks for the delightful reading and the inspiration! If I ever get anything, either doll or human sized hat finished, I’ll send you pictures. -Kathleen
great simple instructions thank you – it looks super
Большое спасибо! Я примерно так себе и представляла, но сама в данный момент делаю шляпу из картона. Получилась симпатичная основа. Завтра утром поищу ткань и буду пришивать или приклеивать, скорее всего приклеивать клеевым пистолетом. У вас получилось очень красиво! И ваш образ вам очень идёт! Благодарю за то, что вы так подробно раскрыли весь процесс! Это так важно, когда есть кто-то, кто может подсказать идеи, сказать как, поделиться опытом!
just loved your article & your sense of humor had me giggling throughout reading it. so dry!!!! i love it! going to save this & definitely use it. LOVED the hat & ALL you guys looked absolutely stunning. well done!!!!
What a fun romp through hat making! I’ve made a few hats, but needed some encouragement for this week. Our costumers’ guild had an even this week. Needed to dress up a previous outfit so it looks new. I think you’ve given me just the inspiration I need. Thanks. I’ll try to catch more of your posts.
Translation of Tatiana’s comment, from the Russian:
Thank you very much! That’s pretty much what I imagined, but I’m currently making a hat out of cardboard myself. It turned out to be a nice base. Tomorrow morning I will look for fabric and will sew or glue it, most likely glue it with a glue gun. You did it very beautifully! And your image suits you very well! Thank you for sharing the entire process in such detail! It is so important when there is someone who can give ideas, tell how, and share experience!
You are a fantastic writer! Your article was very helpful and funny. Thank you!
It’s just Amazing!!! Thanks for sharing!
- 1
- 2