Making a Regency Spencer From a Modern Jacket
I thrifted a modern jacket that I thought had potential for costume cobbling. I tossed it on the project pile*, where it remained for 5 years, as is typical.
Finally motivated, I got right to work, and forgot to take a "before" photo, also as is typical. Here's the jacket, Photoshop'd back together to show you what it looked like, along with a post-surgery view, and its tags:

Not exactly historically accurate (HA). But seeing as I've worn black leggings and a t-shirt on all but 10 of the last 669 days (and nights), I count a Spandex-laden, polyester-lined, all-the-wrong-seams, faux Regency jacket as a step in the right direction. It anticipates a return to the mask-free dress-up events I so enjoyed in The Beforetimes.
I know what the real thing looks like -- what makes a reproduction "historically accurate." If you don't, no shame in that. Here's a primer**:

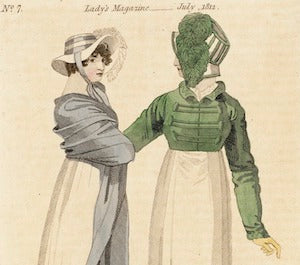
Regency-era Fashion Plates depicting women reading.
Note the green Spencer jacket worn over the dress, at left.
The stylistic period now known as Regency stretched from about 1790-1820. Its name comes from the span of 1811-1820, when Britain's prince regent took the throne while his dad, King George III, was sick. This interim emergency monarchy is called a Regency. 👑
Regency style (along with Empire, Biedermeier, and friends) is part of the neoclassical movement, which recalled the spare, clean lines of Greek and Roman art and architecture. It was a rejection of and contrasted starkly with the over-the-top curlicues and gilding of the Rococo:

The same changes applied to fashion. Highly structured dresses with skirts too wide to fit through doorways gave way to high-waisted, diaphanous columns. What a difference!

But then, fashion can and does change a whole lot in 25 years. Pick any of the following ranges and do a mental comparison: 1900 (late Victorian) vs. 1925 (flapper) vs. 1950 (New Look) vs. 1975 (disco). Just imagine the hairstyles, if not the clothes!
So, back to the Spencer. Over these slim, lighter-weight dresses with their raised empire*** waistlines went coats and jackets to coordinate. Through the years, waists rose from slightly elevated to so high that breasts were practically touching collarbones, then plunged back down to the natural waist before it was all over.
Meet George, 2nd Earl Spencer:

George, 2nd Earl Spencer,
by John Singleton Copley, 1800
When his coattails were singed, so the story goes, he had the jacket altered to be shorter and tailless. I'm skeptical that 18th century British aristocracy were the "make do and mend" sort. But I suppose it's possible. Perhaps Spencer had a thrifty bent. Fire or no, Earl Spencer set a trend.
The jacket's bodice length fluctuated with that of the dress beneath, and trims and other design details went in and out of favor. But Regency garments were, so we’re told, always constructed with distinctive seams.
These original Costume Parisien fashion plates show typical styles of the era:

As you can see, the armscye (armhole) seams creep toward each other while the top and bottom diagonal seams form a diamond shape across the upper back. There is no center seam.
I knew all that when I looked at my thrifted jacket with its vertical back darts, center seam, and 21st century armscyes. I knew, also, that I'm short on time, energy, and patience. I'd love to be able to sew really well, making a proper Spencer "from scratch," with all the lovely details. But expertise doesn't develop through wanting or wishing, and since I haven't prioritized it, it's not going to happen.
Instead of feeling bad about all that, I opted to feel creative and not worry about historical accuracy. I don't expect any fashion police to patrol upcoming events. In fact, I don't anticipate any upcoming events (sigh).
Here's what I did with what I had:
I cut everything off below the waist, leaving what I hoped would be enough to work with. I set the chopped-off piece aside for later.
Here I am with the new hem pinned in place, testing the length:

I hand-stitched the new hem and covered the seam with random bias tape from my stash:

Next, I removed all the sleeve buttons to use as trim. It was a challenge concealing the remaining mess. There was almost no extra fabric to work with and the faux flap wasn't on the seam line:

Yes, it looks like a scar. Moving right along…
Time to add the trim. I tested several options from the stash. This one was a little blue, a little metallic, a nice width, easy to manipulate:

I stitched it by hand onto the edge of the hem, lapels, and collar, adding buttons at the hook-and-eye closure and lapel peaks. I later added another two buttons at the center back hem, as was the style.
Then I moved on to creating the "tail" -- the little back peplum flourish that was quite popular:

I used the leftover piece I'd cut off the bottom of the jacket, trimmed down and gathered into a (less than perfect) fan shape. As you can see in the bottom left photo, I had to add more random bias tape to cover the new seam, because I am crazy.
And that was that. It seemed like a reasonable enough approximation. Still, the all-wrong back seams bugged me. What to do? Google search! On Regency romance author Suzan Lauder's blog, Road Trips With the Redhead, I found a post detailing how to fake the diamond seaming with strategically placed trim:

Great idea! But I had two problems. First, not enough trim, no idea where I'd got it, and being pre-vaccination days, I couldn't go hunting. Second, my jacket had a center seam and a faux diamond would only draw attention to its wrongness.
I set Suzan's tutorial aside for a future project and resigned myself to multi-level historical inaccuracy.
Then, to my surprise, I found these original fashion plates:

And that was all the evidence I needed to avoid additional work and consider the project complete.
My faux Spencer is now living in my Regency costume tub, along with its "upcycled church suit" sister, awaiting the end of the apocalypse and a return to playing dress-up. Here's how it turned out:
More views:
Thank you for reading. I hope you're inspired to take on a costume project of your own, without worrying what the HA police or the negative voice in your own head may think. At very worst, you'll be out the cost of a thrifted inspiration piece and a few enjoyable hours of your time. You’ll probably learn something along the way. Overall, it's a low-risk, high-reward proposition.

*OK, not true. I'm way too uptight to “toss anything on a pile.” At worst I would neatly fold it and add it to a tidy stack. In actuality, I placed it on a hanger and hung it on the project rack (where it really did remain for 5 years). But that's wordy and doesn't have any sort of ring to it.
**Did you know that the word primer rhymes with simmer when it means "beginner's guide" (as opposed to rhyming with timer when it means "the stuff you apply before the real paint")?
***Empire (pronounced: ahm-PEER) style was named (after-the-fact) for the First French empire of Napolean. It's another sub-set of "neoclassicism."
