Making a Victorian Carpet Bag
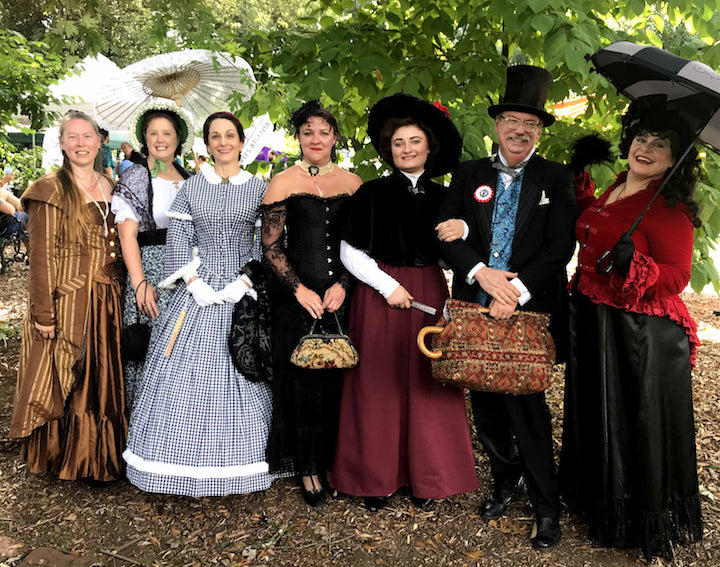
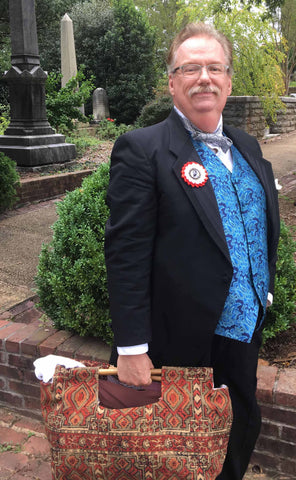
The photo above shows members of The Atlanta Time Travelers at the annual Sunday in the Park event at historic Oakland Cemetery. That's me in a blue gingham 1860s day dress (by Historical Designs). And just look at my friend Steve's wonderful bag!
Here's a closer look:
It easily held a picnic blanket, full-size umbrella (the weather was iffy), snacks, water bottle, and more. So handy! Compare that with the tiny reticule we historic-costume ladies typically carry or even the capacious poche-pompadour (traveling bag) on my arm.
When Steve told me he'd made his bag the night before from an import-store carpet and without using a pattern, I was once again blown away by his creativity and ingenuity. And I wanted to make one, too!
Within a few weeks he'd managed to find two more of the carpets at our local World Market. As you can see, they cost $20 and come in a variety of designs -- if you can find them:

If you don't have a World Market near you, try an eBay search for "2x3 cotton rug." If you're going for a period-correct look, add "block print" to the search terms. If you just want a cool bag, your only concern is how your chosen design will look when it's folded in half.
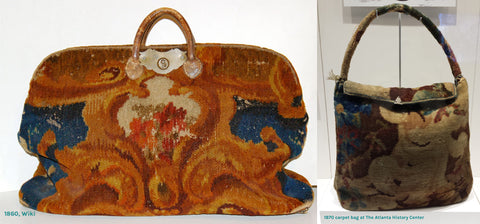
Yes, authentic carpet bags such as these antiques were made from wool carpet remnants (most had leather handles and many had top frames).
Perhaps you can find wool carpet thin enough to work with. But without industrial machines or iron fingers, the cotton rugs were about as thick and ornery as we were willing to go. I suspect our bags are lighter to carry, although they're by no means insubstantial or flimsy.
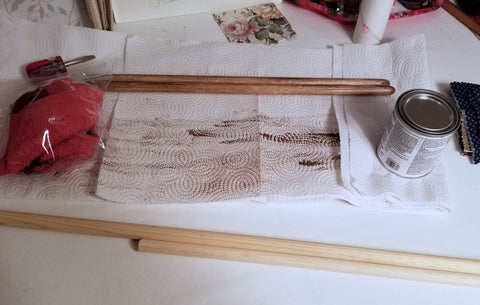
In addition to the rug (and needle and sturdy thread), you'll need one 36" wooden dowel and some wood stain. Both are available at any hardware store. The dowel costs less than $1, the stain is about $8. Steve used a 5/8" diameter rod and it worked well for him. I chose a slightly slimmer, more delicate 1/2" diameter rod. It's easier on my smaller hands, and creates a less-rugged, more-feminine look.
Before you start making the bag itself, you can prep your handles so they'll have time to dry.
Making the handles:
- Cut your dowel into 16" lengths with a saw. Sand the ends to round them.
- Stain to your desired color. I did about four coats with a one-step stain/sealant. Let dry completely.
Once we'd gathered all the ingredients, Steve came over for an enjoyable Saturday of "cobbling." He told me exactly what to do, step by step. Did I mention he's exceedingly patient? He recalled his first-timer errors such as cutting the handle notches too deep and placing the pockets too high, and we adjusted accordingly.
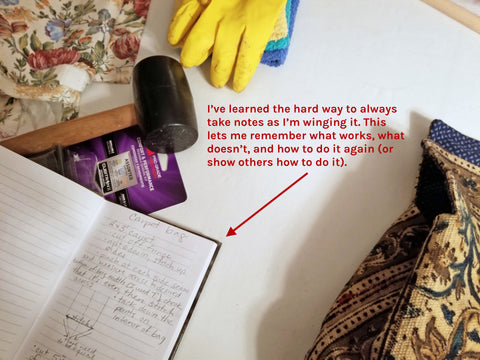
Knowing how difficult it can be to remember exactly what I did once I've done it, never mind weeks or months later, I kept notes of the process so I could share it with you, and, if so inclined, successfully repeat it down the road.
Here are the steps:
1. Create the body of the bag:
- Cut any fringe¹ from the top and bottom edges of your carpet.
- With the right side facing in, fold the carpet in half so the bottom and top edges meet.
- Sew up the sides².
2. Shape the bottom of the bag:
This step creates more structure and allows your bag to remain upright when you set it down. All this is done with the bag still inside-out. Here are my notes:
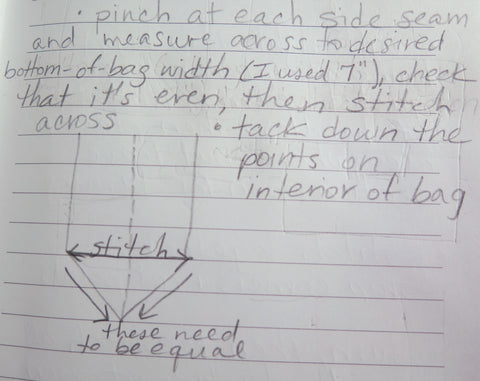
The dotted line in my drawing represents the side seam you just created in the previous step. Use it as the center line for creating your bag's base. The line that says "stitch" is 7" across. You do this step twice, once on each side.
Your bag's bottom-to-sides ratio is up to you, but you're limited by the total length you have to work with. A wider bag provides easier access. A taller bag is more secure. A lot depends on what you're carrying and how you'll use it.
Before tacking down the points, iron the triangles flat and toward each other (toward the center of the bag). You are making them disappear. Truth is, you don't need to tack them down once they're pressed, as the insert you'll make later secures them perfectly well. I'm just very OCD about finishing. That's why everything takes me at least twice as long as it needs to, even if I don't make any mistakes. Feel free not to be as crazy as I am.
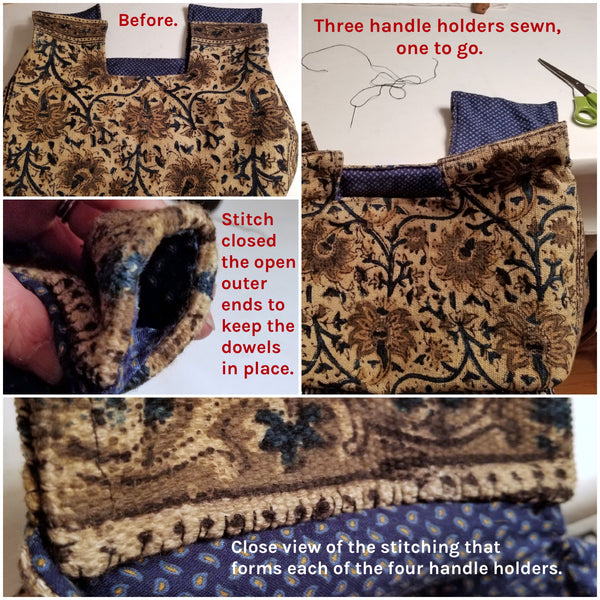
3. Create the handle holders:
This step makes four flaps that will eventually be folded over to make channels for your dowel handles.
- From each long side of the bag cut a 5" x 5" notch at center. If you have strong hands and good scissors, you can cut both sides at once. If not, use what you cut from side 1 as a template for side 2. Take care to cut the notch in the same spot on both sides.
- Along each short side of the bag (the gusset) cut a 4" deep notch.
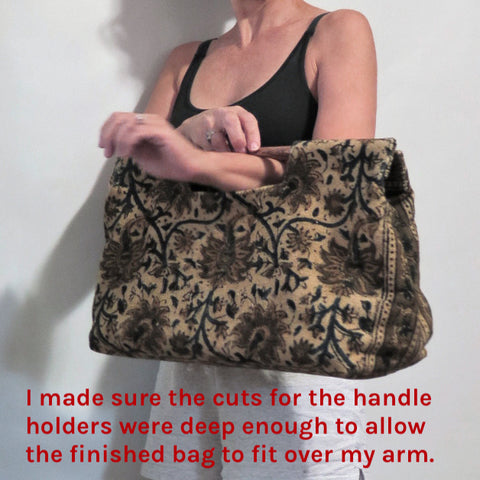
For my bag, we estimated that a 5" x 5" notch would create a not overly deep space that still allowed me to slide the handles over my arm without smushing the bag. We were mostly right:
4. Create and place the lining:
Using a 2'x3' piece of coordinating fabric, repeat steps 1 and 2, above. Do not cut notches.
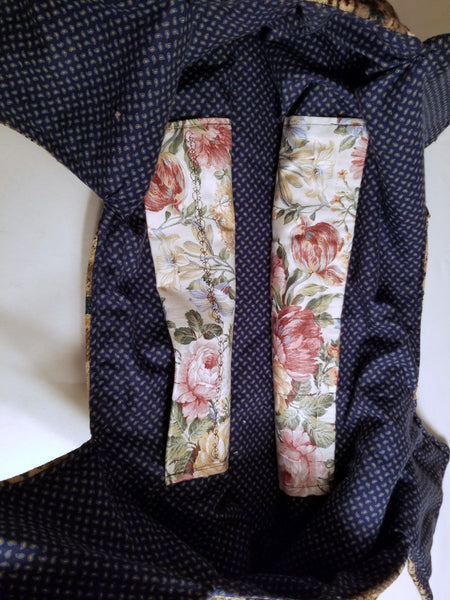
- Create any desired pockets and sew them to the lining. How many and what style is up to you. Just be sure to place them on the lining low enough to be hidden when the bag is in use but high enough to avoid getting caught in the base liner at the bottom of the bag.
- Place the prepared lining and bag together with right sides facing each other (inside-out lining inside the inside-out bag).
- Pin the lining to the bag at key points: interior corners, gusset seams, the top of each handle. Then, pin the rest, leaving only a small section free to allow you to flip the whole thing right side out once it's stitched together.
- Stitch the whole thing together except for the section without pins.
- Check for and remove any stray pins!
- Flip the bag right side out.
- Trim away the excess lining fabric between the handle flaps, being sure to leave a generous allowance. Turn this allowance under, press, and pin in place.
- Top stitch around the whole thing.
I made one deep pocket and one shallow, three-section pocket. Two of the sections are for holding business cards:
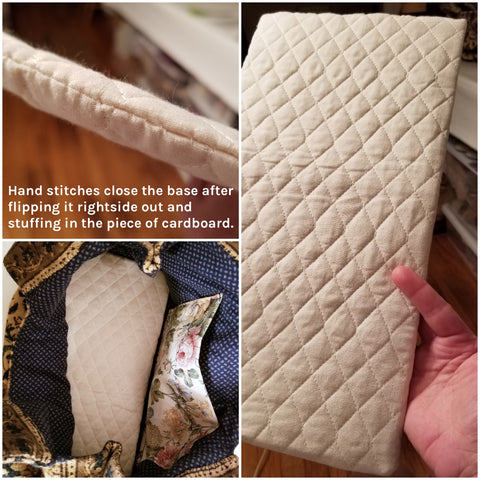
5. Make and insert the base liner:
This is optional, but it enhances the structure and gives the bag a sturdier feel.
- Cut a piece of cardboard the size and shape of the bottom of your bag.
- Cover the cardboard with coordinating fabric of your choice:
- Place the base liner into the bottom of the bag.
I used quilted fabric I had on hand to make it a bit cushy and cozy. The result amused a friend, who said it looked like a sanitary napkin. Now it makes me laugh.
6. Finish the Handle Holders and Insert the Handles³:
- Fold each flap over and sew along its bottom edge.
- Slide the dowels into the handle-holder channels.
- Sew shut each channel's outer end to hold the dowel in place. You can still remove the dowels if you need to, there's just a bit of wrangling involved.
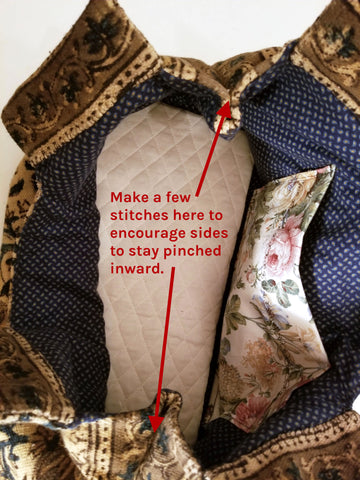
7. Stitch the gusset pinch in place:
This is optional, but it prevents the sides from poofing out and creates a nicer shape.
8. Personalize your finished project:
You might choose to sign and date your work, as I did. Yes, my embroidery skills have much room for improvement:

I think the only thing I'd add is little brass feet to keep the bag off the ground. I will have to figure out where to find and how to attach them.
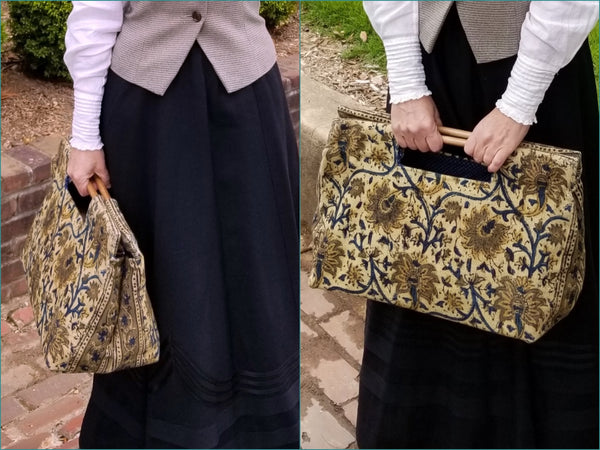
Here I am, back at Oakland Cemetery, carrying my completed bag to volunteer for their annual "Capturing the Spirit of Oakland" series of tours.
My thanks to Steve for his guidance, patience, and companionship. Can't wait for our next project!

¹ You could opt to leave the fringe in place, as it might look really cool. But for our purposes, to look more period-correct, we removed it.
² Unless your machine is very sturdy (or you are Hercules with needle and thread), you should sew just inside of the bulk of the doubled hems along the sides of the carpet. Yes, you could cut off the hems before sewing, but then you'd have to zig-zag or Fray-Check the whole thing to prevent unraveling.
³ You can wrap the flaps around the dowels and stitch them closed with the dowels in place, or stitch the flaps closed and then insert the dowels through the open ends before sewing the outer ends shut. I think the second way is easier. I did it the third way -- stitching the flaps and the ends, then wrangling the dowels into place. D'oh! 
Comments
Wonderful work!!! I can’t wait to make this bag.
Thank you, Janice. Please come back and show us your results, and let us know if you hit any snags, or found any easier/better ways to do any of the steps.
Beautiful bag(s)! Thanks for posting your making process; I’m going to try & make a carpet bag style gym bag ;-)
Thinking a piece of balsa in bottom lining maybe good for securing the brass footers
Carol, thanks for that suggestion! It’s a good one.
Do I have to use dowels in this pattern you gave or can I just not cut out the whole and put magnetic strips in it and then a handle
Carla, There are no rules, and you are free to make your bag in any way you like! Your idea sounds like a good one. Let us know how it turns out. Thanks very much for reading my post!
Thank you so much, Liza. I am asking my sister to make one of these for me. What a great idea!